This is baking through a nostalgic lens. Familiar, comforting, and deeply rooted in memory. It’s soft vanilla sponge, sweet jam, and coconut in its simplest form, and it doesn’t try to be anything else. This is the kind of cake that doesn’t shout for attention, it quietly wins you over, especially when served warm with custard.
Jam & Coconut Sponge
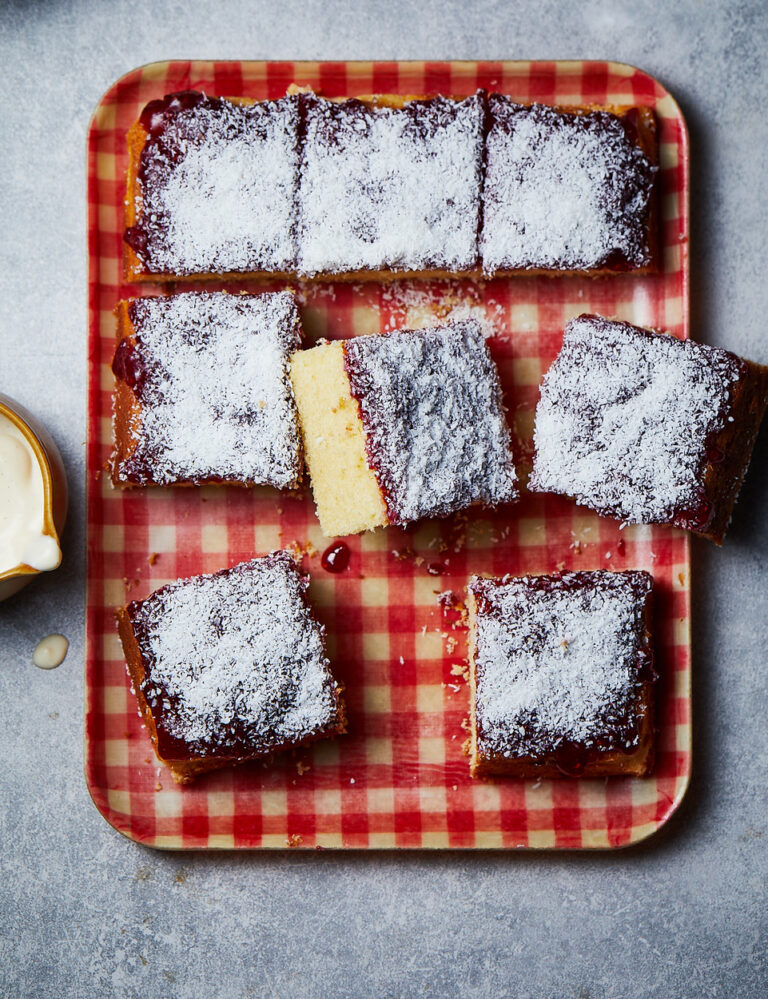
Jam and coconut sponge is one of those cakes that almost everyone recognises, even if they haven’t eaten it in years. It’s a staple of British school dinner menus, a proper old-school classic that showed up regularly, sliced into neat squares and served with thick custard ladled generously over the top. No frills, no decoration, just comfort on a plate.
This cake earns its place in Speedy Comfort because it represents exactly what that book is about. Food that’s easy to make, deeply familiar, and genuinely satisfying. It’s not about impressing anyone, it’s about feeding people well. It’s baking that feels safe, reliable, and comforting, the kind of recipe you can come back to again and again.
What makes this cake special isn’t complexity, it’s balance. The sponge is soft but sturdy, designed to hold up under a layer of jam and coconut without collapsing. The jam adds sweetness and moisture, while the coconut brings texture and a subtle nuttiness that stops the whole thing from being flat. When you add custard, it all comes together in a way that feels instantly familiar.
This isn’t a cake that needs reinvention. It just needs to be done properly.
The sponge itself is a straightforward all-in-one method, which is exactly how these cakes were made in school kitchens. Butter, sugar, eggs, flour, milk, and vanilla all beaten together into a smooth batter. No separating eggs, no folding, no worrying about air bubbles. It’s forgiving, reliable, and produces a soft crumb every time.
The topping is just as simple. Jam spread generously over a completely cooled sponge, followed by desiccated coconut sprinkled evenly over the top. That’s it. The coconut sticks to the jam, creating that unmistakable finish that instantly takes you back.
Why this cake works so well
Jam and coconut sponge works because it knows what it’s trying to be. It’s not light and airy like a Victoria sponge, and it’s not rich and dense like a brownie. It sits right in the middle. Soft, moist, and comforting.
The use of self-raising flour gives the sponge enough lift without needing any extra raising agents. Milk keeps it tender. Vanilla adds warmth without overpowering. The jam provides moisture and sweetness, and the coconut adds texture without making the cake heavy.
It’s also a cake that slices beautifully. Once cooled, it cuts cleanly into neat portions, which is exactly why it was so popular in school kitchens. It holds its shape, doesn’t crumble, and travels well.
The importance of letting it cool
One of the most important steps in this recipe happens after baking. The cake must be completely cool before you add the jam. If you spread jam onto a warm sponge, it melts, runs, and soaks in unevenly. Cooling the cake properly gives you a clean layer of jam that holds the coconut in place.
Turning the cake upside down onto a cooling rack is a small but useful trick. It gives you a perfectly flat surface to work with, making the finished cake look neat without any extra effort.
Custard is not optional (emotionally)
Technically, you can eat this cake on its own. Practically, it’s crying out for custard. Warm vanilla custard poured over a square of jam and coconut sponge is where this cake truly comes into its own.
The custard soaks into the sponge, softens the coconut, and turns the whole thing into something that feels more like a dessert than a cake. If you’re serving this to anyone over the age of 30, expect immediate recognition and strong opinions about whether custard should be hot, thick, pink, or yellow.
A cake that invites nostalgia
This is the kind of recipe that sparks conversation. People remember where they ate it, who served it, and how it tasted. It’s tied to memories of school halls, metal trays, plastic cutlery, and the excitement of seeing it appear on the dessert counter.
That nostalgia is powerful, and this cake delivers it without trying too hard. It’s familiar in the best way, and that’s exactly why it still deserves a place in modern kitchens.
Equipment
Ingredients
For the sponge
180 g butter, softened
180 g caster sugar
3 medium eggs
180 g self-raising flour
50 ml milk
2 tsp vanilla extract
For the topping
250 g raspberry jam
25 g desiccated coconut
Method
Preheat the oven to 180C. Grease and line a 20cm square baking tin with baking paper.
Add the softened butter and caster sugar to a large mixing bowl. Whisk until light, pale, and creamy.
Add the eggs, self-raising flour, milk, and vanilla extract. Beat until well combined and smooth.
Pour the batter into the lined tin and spread it evenly into the corners.
Bake for 30 minutes. Check it’s cooked by inserting a skewer into the centre, it should come out clean.
Remove from the oven and leave to cool in the tin for 10 minutes, then turn out onto a cooling rack to cool completely. Turning it upside down will give you a flat surface.
Once fully cooled, spread the jam evenly over the top of the sponge.
Sprinkle over the desiccated coconut, pressing it lightly into the jam.
Cut into portions and serve. Best enjoyed with warm vanilla custard.
FAQs
Why is this cake in Speedy Comfort?
Because it’s simple, reliable, and deeply comforting. It represents nostalgic cooking done properly.
Can I use a different jam?
Yes. Strawberry or mixed berry work well, but raspberry is the classic choice.
Can I make this ahead of time?
Absolutely. It keeps well for 2–3 days in an airtight container.
Can I freeze it?
Yes, freeze without the jam and coconut, then top after defrosting.
Why turn the cake upside down to cool?
It gives you a flat surface for spreading the jam evenly.
Is custard essential?
Technically no. Emotionally and nostalgically, yes.
This jam and coconut sponge is everything it should be. Simple, nostalgic, comforting, and completely unpretentious. It doesn’t chase trends or try to be clever. It just delivers exactly what you expect, and sometimes, that’s the best kind of recipe there is.


7 comments on “Jam and Coconut Sponge”
Very nice. This might just make it to the Christmas table this year.
Such a lovely sponge/ light and perfect. The jam and coconut are perfect on top too – easy to follow recipe. Thanks
This delicious cake took me back to my schooldays when 8 expert cooks prepared everything from scratch in the kitchens. It’s a family favourite, my grandsons devour it (as do I) and I’ve had so many friends ask for the recipe. Easy to make and never any left.
Great Sunday cake, came out perfect.
Thank you so much for this recipe, going to get on more.
Sharing with famlam
Very easy to make, came out great and taste really nice.
Hi, is it 180 fan heat setting please?
Yes!