The Ultimate Chicken Kiev
Few dishes have had the cultural glow-up quite like Chicken Kiev. Once the centrepiece of 1970s dinner parties and 1990s freezer aisles, it has somehow circled back around to become a proper comfort classic again. And rightly so. When it’s done properly, it’s elite.
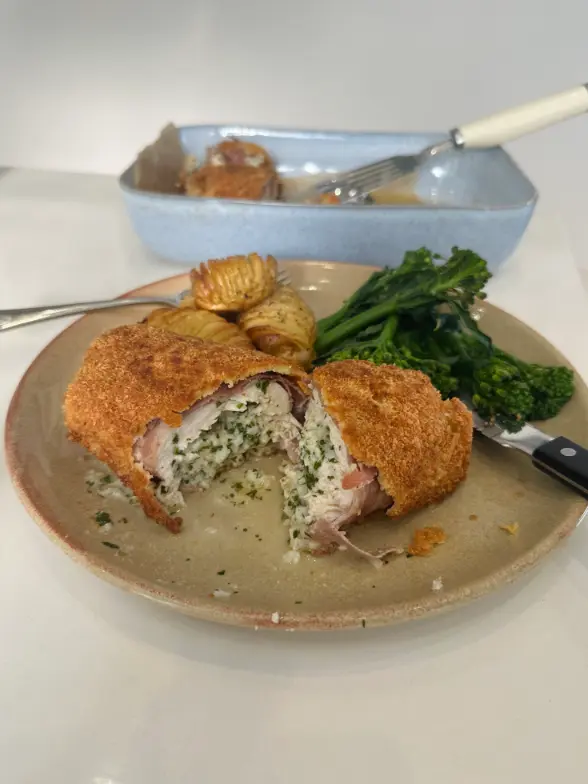
At its heart, Chicken Kiev is simple. Chicken breast stuffed with garlic butter, coated in breadcrumbs, fried until golden, then baked until the centre melts into that iconic molten core. You cut into it, and the butter floods the plate. It’s dramatic. It’s nostalgic. It’s ridiculously satisfying.
Traditionally linked to Eastern Europe, often associated with Ukraine despite French technique influences, the dish gained huge popularity in Britain during the late twentieth century. It became shorthand for indulgent home cooking. But somewhere along the way, it got a bit tired. Overcooked chicken, bland butter, soggy breadcrumbs. We’re not doing that.
This version brings it back properly. A punchy garlic butter enriched with parmesan and lemon. Parma ham wrapped around the breast to seal everything in and add savoury depth. Parmesan in the breadcrumbs for extra crunch and flavour. It’s still recognisably a Kiev, but sharper, saltier and more indulgent.
I served this with roasted baby hasselback potatoes and tender stem broccoli, but it works just as well with a simple salad or even chips if you’re leaning into the comfort factor. You can fry and bake, or cook fully in the oven or air fryer if you prefer.
This is the ultimate Chicken Kiev. Crisp outside. Molten inside. Zero compromise.
A little history of Chicken Kiev
Despite the name, the origins of Chicken Kiev are debated. Some food historians trace similar butter-stuffed chicken dishes back to French culinary traditions in the nineteenth century. Others associate it with Ukrainian cuisine, particularly dishes served in Kyiv during the early twentieth century.
What is certain is that the dish became wildly popular in Britain in the 1970s and 80s, when garlic butter felt luxurious and continental. It was restaurant fare, then supermarket gold. By the 1990s, it was a freezer staple.
The core idea never changed. Butter inside meat. Crisp outside. Drama when cut open.
This recipe respects that tradition but sharpens it up with better ingredients and better balance.
Why this Chicken Kiev works so well
The garlic butter is properly seasoned. Butter alone is fine. Butter with garlic, parmesan, parsley and lemon is next level. The parmesan adds umami and salt, the lemon lifts the richness, and the parsley keeps it fresh.
Chilling the butter into a firm sausage shape is essential. It ensures clean slices and prevents it from melting too early during assembly.
Cutting a neat pocket rather than butterflying the chicken keeps everything contained. Structure matters here.
Wrapping the chicken in Parma ham is the upgrade. It reinforces the seal around the pocket and adds savoury depth. It also reduces the risk of butter leakage during cooking.
A classic flour, egg and breadcrumb coating ensures maximum crispness. Mixing parmesan into the breadcrumbs gives extra flavour and helps the crust brown beautifully.
Shallow frying first creates colour and crunch. Finishing in the oven ensures the chicken cooks through without burning the coating.
It’s texture engineering. Crisp shell. Juicy chicken. Molten centre.
Equipment you’ll need
Cling film for shaping the butter.
A sharp knife for cutting the pocket.
Three shallow trays for breading.
A large frying pan.
An ovenproof dish.
Kitchen paper for draining.
Organisation is everything here.
Ingredients
Garlic butter
70 g butter, softened
3 cloves garlic, minced
15 g parmesan, grated
5 g parsley, chopped
½ lemon, juiced
Kievs
2 chicken breasts
4 slices Parma ham
50 g plain flour
2 eggs, lightly beaten
80 g breadcrumbs
40 g parmesan, grated
Cooking oil for frying
Salt and black pepper
How to make it
Start with the garlic butter. Combine the softened butter, minced garlic, grated parmesan, chopped parsley and lemon juice in a bowl. Mix until evenly combined.
Place the mixture onto cling film and roll tightly into a sausage shape. Twist the ends to seal and refrigerate until firm.
Preheat the oven to 180C fan.
Using a sharp knife, carefully cut a deep pocket into each chicken breast, being careful not to cut all the way through.
Remove the chilled butter from the fridge and slice into ½ cm rounds.
Insert 2 to 3 slices of butter into each chicken pocket, depending on size.
Wrap each breast with two slices of Parma ham, ensuring the pocket opening is well covered.
Set up your breadcrumb station. Place flour in one tray. Beaten eggs in another. Mix breadcrumbs with grated parmesan in a third.
Season the chicken lightly with salt and pepper.
Coat each chicken breast in flour, shaking off excess. Dip into the beaten egg, then coat thoroughly in the breadcrumb mixture.
Heat a generous layer of oil in a frying pan over medium to high heat.
Shallow fry the chicken until golden brown on all sides. This should take about 4 to 5 minutes per side.
Transfer the browned chicken to an ovenproof dish.
Bake in the oven for about 20 minutes, or until the chicken is cooked through and the internal temperature reaches 75C.
Let it rest for a few minutes before serving.
Alternative cooking methods
You can cook these fully in the oven at 200C fan for around 30 minutes, though the coating may be slightly less crisp.
In an air fryer, cook at 190C for about 20 to 25 minutes, turning halfway through. Spray lightly with oil for best results.
Tips for best results
Make sure the butter is fully chilled before inserting it.
Do not overfill the chicken. Too much butter increases leakage risk.
Press the breadcrumbs on firmly for an even coating.
Seal the pocket side well with Parma ham.
Keep the frying oil at a steady temperature. Too hot and the coating burns. Too low and it absorbs oil.
Let the Kiev rest before cutting. This reduces excessive butter loss.
Storage and leftovers
Best eaten fresh for maximum crunch and molten centre.
Store leftovers in the fridge for up to 2 days.
Reheat in the oven at 180C to restore crispness. Avoid microwaving if possible.
You can freeze uncooked, breaded Kievs. Freeze flat, then cook from frozen, adding extra time in the oven.
FAQs
Why did my butter leak out?
The pocket may not have been sealed properly, or the butter wasn’t chilled enough.
Can I prepare these ahead of time?
Yes. Assemble and bread them earlier in the day, then refrigerate until ready to cook.
Can I use chicken thighs?
It’s possible but more difficult to stuff neatly. Breasts are easier to work with here.
Is the Parma ham necessary?
Not essential, but highly recommended. It helps seal and adds flavour.
What should I serve it with?
Roasted hasselback potatoes and tender stem broccoli are ideal. A crisp green salad also works.
How do I know when it’s cooked?
The internal temperature should reach 75C, and the juices should run clear.
Crisp golden coating. Juicy chicken. Garlic butter lava in the centre.
The ultimate Chicken Kiev takes a retro classic and makes it properly exciting again. Big flavour, big crunch, and that unbeatable cut-through moment when the butter flows.
Comfort food with drama. Done right.